A blog about the shirt designs I make and how it's made with tips and tricks, enjoy.
Wednesday, August 28, 2019
Art theft on Aliexpress
#warning #beaware I've found one of mine designs on @aliexpress. I didn't give permission to sell this to the shop. Contacted the shop , he would delete it. But it's still for sale. Almost impossible to contact Ali. So this is a bad quality product made from a low resolution screen shot. And this is not the only design stolen. So if you want quality then visit @teepublic , @redbubble , @neatoshop or @spreadshirt to buy from the original artist. It isn't that big difference in price, if something went wrong those pod sites have a customer service that doesn't let you down. Probably this design isn't going to be removed like a lot of other art from fellow artists, and a lot of customers get scammed by those shops on AliExpress / Alibaba. It's a sad thing. -
Feel free to share to spread awareness.
-
#artist #arttheft #shirtdesigns #shirt #aliexpressshopping #aliexpress #aliexpressfashion #sharingiscaring #scam #stolenart #stolenartwork #andres7b9


Monday, July 15, 2019
Sunny summer design
With this design I'm trying a different approach. First thing it's a more simple and easier to recognise design. A smarter use of colours and the use of multiple outlines makes it a simple but detailed design.
In this close up you can see the main line art is a dark blue with a thin lighter blue outline. The same is done with the drawing itself, first a light blue and then another line of pink.
And for those who doesn't like the text, there also is one without text that looks great on for example a dress:
On Redbubble: Link to shop
My shops: Neatoshop
Teepublic
Redbubble
or Spreadshirt
Labels:
bright,
colourful,
food,
how it's made,
ice,
ice cream,
shirt,
shirtdesign,
summer,
summershirt,
sun
Thursday, June 20, 2019
How it's made
It all starts with a sheet of paper. I just like to draw on paper it feels better when you have to think first about the amount of space you have, when there is less room for errors and the lines you make aren't corrected to a perfect smooth line. I know with the right equipment a full digital drawing can be an amazing piece of art but very often it becomes an anonymous art where you can't recognize the style of the artist. So my steps are:
Step 1: This is the brainstorm and sketch step, usually I make a couple of quick sketches trying ideas and compositions to see what works best. Very important step, if the quick sketch doesn’t look good you’ll probably end up with something that could be much better.
Step 2: From a couple of sketches I pick the best looking and start to draw the design with pencil and paper. This one is from "Endless Chase"
Step 3: When the drawing is finished it’s time to trace the design. I used to do this on the original but recently I purchased an A4 lightbox to trace the drawing with fineliners. A good idea if you have a drawing with a lot of details. Also saves a lot of time erasing the pencil lines.
Step 4: At this point the design is digitized. It gets scanned and cleaned up. I use GIMP to remove dust pixels and little slips of the pen. Only thing at this point the design has a low resolution. ( Sorry no images but I'll post a tutorial in the future about this topic )
Step 5: The resolution must be higher, and if you’re a traditional artist you might recognize this. The solution is to trace the drawing with Inkscape. This way converts the drawing to a vector graphic ( be careful with smoothing lines ). And with this vector graphic you can scale up to any resolution you like. Save everything with a transparent background and we are ready for the next step.
Step 8: I think it is a good idea to wait a day or maybe longer before I upload the design. Very often I discovered little things like forgot to add my signature. And if everything is still good than I upload my work. At the same time I make a promotional image for social media channels. My advice don’t upload the same high resolution file to any social media, someone else can take your work with no problem.
Step 9: Is promoting my design on different social media. And thinking about the next one. My favorite is Instagram because that’s aimed on images. But maybe you prefer a different channel.
Until next time, have a great day.
Greetings Andres
Step 1: This is the brainstorm and sketch step, usually I make a couple of quick sketches trying ideas and compositions to see what works best. Very important step, if the quick sketch doesn’t look good you’ll probably end up with something that could be much better.
Step 2: From a couple of sketches I pick the best looking and start to draw the design with pencil and paper. This one is from "Endless Chase"
Step 3: When the drawing is finished it’s time to trace the design. I used to do this on the original but recently I purchased an A4 lightbox to trace the drawing with fineliners. A good idea if you have a drawing with a lot of details. Also saves a lot of time erasing the pencil lines.
Step 5: The resolution must be higher, and if you’re a traditional artist you might recognize this. The solution is to trace the drawing with Inkscape. This way converts the drawing to a vector graphic ( be careful with smoothing lines ). And with this vector graphic you can scale up to any resolution you like. Save everything with a transparent background and we are ready for the next step.
Step 6: Time to add colors. Back to GIMP selecting areas with the magic wand and fill those with color and finish those areas with maybe a brush to add shades , textures etc. Best practice is to save multiple steps in this process. In case you want to change a thing you don’t have to redo everything.
Step 7: After the design is fully colored there is an opportunity to add text , outlines or maybe something else to make it complete.
Step 8: I think it is a good idea to wait a day or maybe longer before I upload the design. Very often I discovered little things like forgot to add my signature. And if everything is still good than I upload my work. At the same time I make a promotional image for social media channels. My advice don’t upload the same high resolution file to any social media, someone else can take your work with no problem.
Step 9: Is promoting my design on different social media. And thinking about the next one. My favorite is Instagram because that’s aimed on images. But maybe you prefer a different channel.
Until next time, have a great day.
Greetings Andres
Thursday, June 6, 2019
Welcome
Short introduction: my name is Andres and in my spare time I make shirt designs. I live in the South of Netherlands together with my lovely wife and daughter.
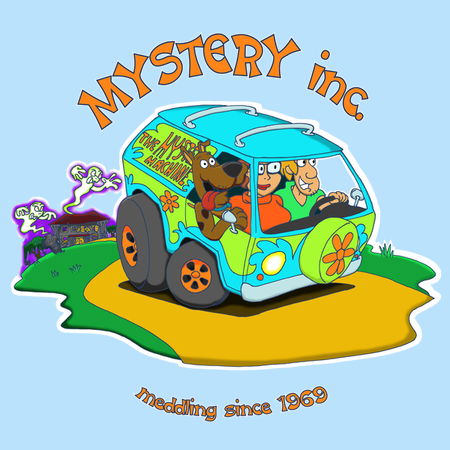
I always loved to draw and a couple of years ago in 2017 I started drawing again after a long period of drawing almost nothing.My first T-shirt design I've published online was a Scooby Doo fanart "Mystery inc meddling since 1969" . And now a couple of years later I'm starting with my first blog. At the moment I'm still exploring how everything works, so maybe a slow start.
In the future I'll be blogging about work in progress, tips and tricks maybe a tutorial or even some art related stuff for example how to modify a laptop for art on a small budget and of course there will be promotional blogs if there is a new design.
So let's end this first short post with a image of my first design
Have a great day, Greetings Andres
Subscribe to:
Posts (Atom)